Modules
ZMK makes use of Zephyr modules to include additional source code or configuration files into its build. You can think of them as similar to plugins or themes. The most common uses of this feature are:
- Building firmware for a keyboard external to ZMK's tree
- Adding functionality to ZMK, such as a driver or a behavior
A common ZMK setup thus consists of the following separate components, commonly housed in their respective Git repositories:
- A single ZMK config maintained by the user, containing the
.confand.keymapfiles for one or multiple keyboards. This is also where files from ZMK or modules should be overridden/modified, if there is a need. - Any number of ZMK modules, maintained by the module's owner. Some modules may contain multiple keyboards or functionalities. If all of your keyboards and functionalities are internal to ZMK's tree, then no modules are necessary.
- The ZMK firmware itself, maintained by its contributors.
The shift to using modules for keyboards is a relatively recent one, and not all designs may be properly configured to be used as a module. If this is the case for your keyboard, then we would strongly suggest asking your vendor or designer to rectify this.
Building With Modules
GitHub Actions
When using GitHub Actions to build ZMK, adding modules is as simple as modifying the west.yml found in your zmk-config's config directory. The recommended way of doing so is:
- Find the URL base (the parent URL) for the module and add it as an entry to the remotes.
- Add the module as an entry to the projects.
Aside from the mandatory
name,remote, and the commonly usedrevisionproperties, take note of theimportproperty underprojects. Some modules may have other modules as dependencies. This property allows the specifying of an additional west manifest file found in the tree of the module, which will automatically import all dependencies.
For more information on west.yml, see West Manifests.
Examples
- Default
- Module A
- Modules A + B
manifest:
  remotes:
    - name: zmkfirmware
      url-base: https://github.com/zmkfirmware
  projects:
    - name: zmk
      remote: zmkfirmware
      revision: main
      import: app/west.yml
  self:
    path: config
manifest:
  remotes:
    - name: zmkfirmware
      url-base: https://github.com/zmkfirmware
    - name: module_a_base
      url-base: https://github.com/alice
  projects:
    - name: zmk
      remote: zmkfirmware
      revision: main
      import: app/west.yml
    - name: module_a
      remote: module_a_base
      revision: main
  self:
    path: config
manifest:
  remotes:
    - name: zmkfirmware
      url-base: https://github.com/zmkfirmware
    - name: module_a_base
      url-base: https://github.com/alice
    - name: module_b_base
      url-base: https://github.com/bob
  projects:
    - name: zmk
      remote: zmkfirmware
      revision: main
      import: app/west.yml
    - name: module_a
      remote: module_a_base
      revision: main
    - name: module_b
      remote: module_b_base
      revision: main
      import: west.yml
  self:
    path: config
Building Locally
To add a module to your build when building locally, you will need to clone/copy said module into your local file tree. You can then build using the module as described in Building with External Modules.
Beta Testing
You may find that there are some features which you desire for which there is a Pull Request, but no module. If this is the case, you can still make use of the feature.
Developer Repositories and Branches
For a developer to submit a pull request to ZMK, they must first clone the original ZMK repository. After they have a copy of the source code, they may create a feature branch to work within. When they have finished, they will publish the feature branch and create the pull request.
Finding the repository page from the Pull Request
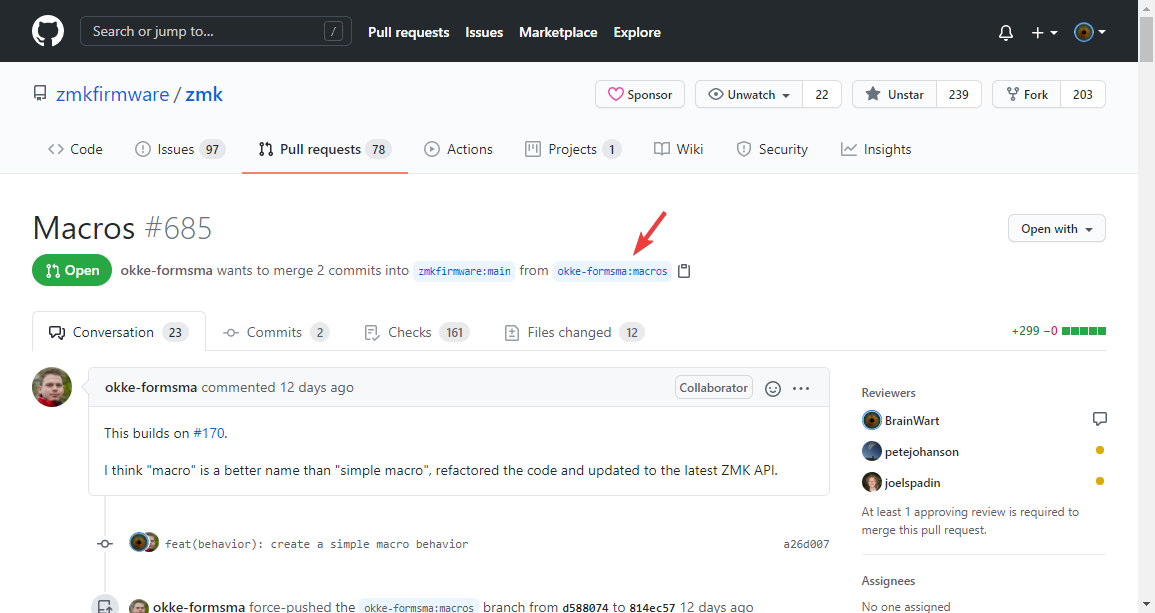
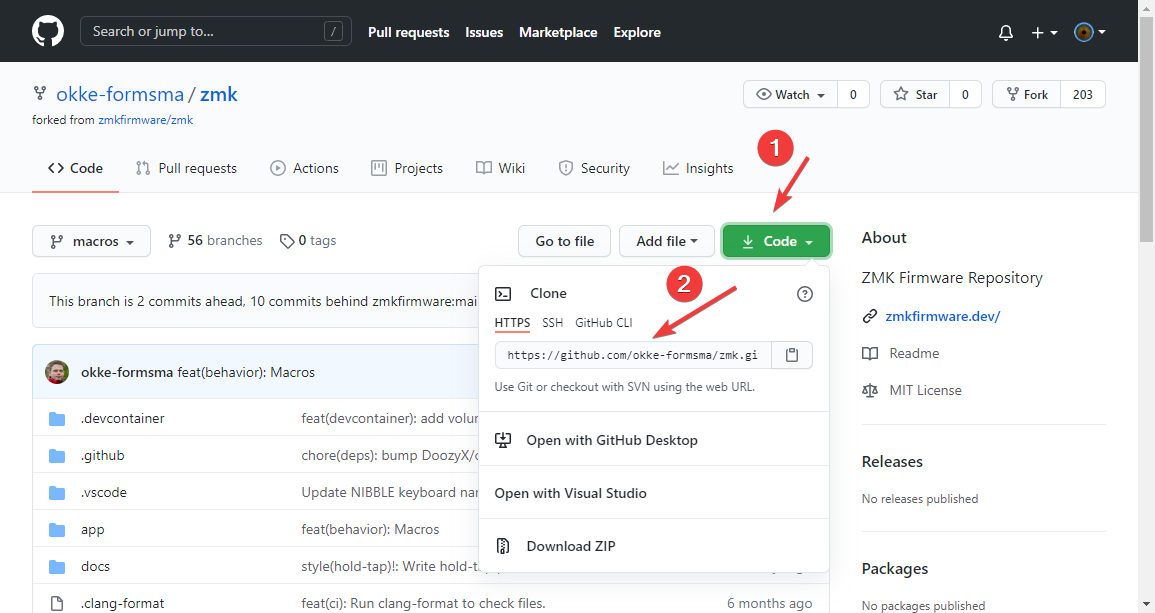
Finding the repository URL
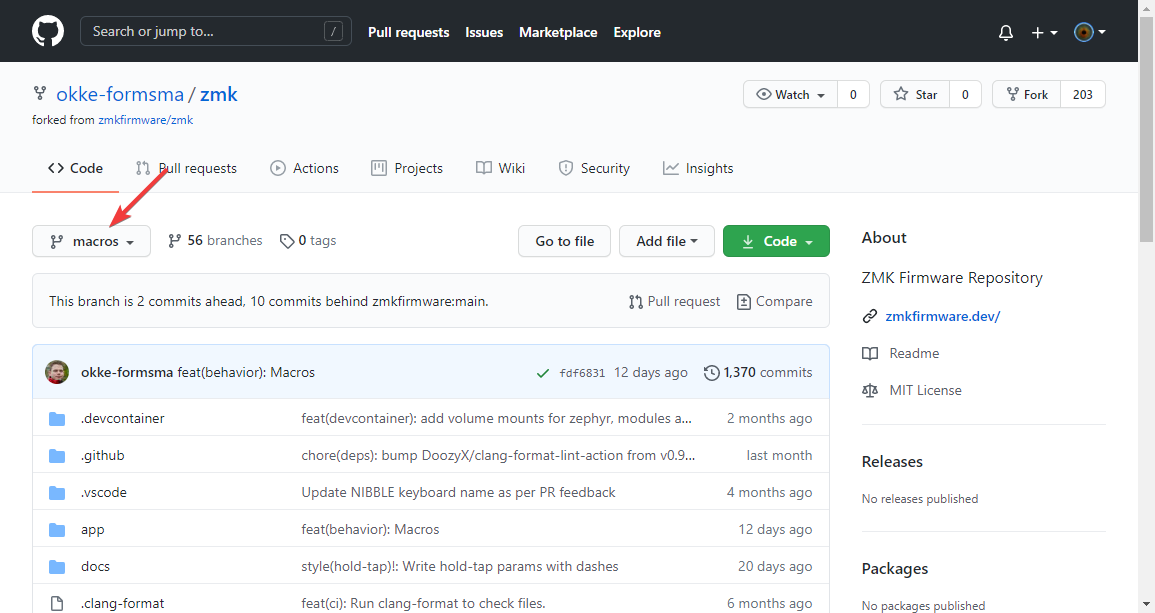
Finding the repository branch
Testing Features
GitHub Actions
When using GitHub Actions to build ZMK, once you have obtained the correct URL, you'll need to modify the west.yml file similarly to Building With Modules. Add the remote for the branch like in said section. The difference is that you will need to change the selected remote and revision (or branch) for the zmk project.
Example
- Default
- Alternative
manifest:
  remotes:
    - name: zmkfirmware
      url-base: https://github.com/zmkfirmware
  projects:
    - name: zmk
      remote: zmkfirmware
      revision: main
      import: app/west.yml
  self:
    path: config
manifest:
  remotes:
    - name: zmkfirmware
      url-base: https://github.com/zmkfirmware
    - name: forkedzmk
      url-base: https://github.com/forkedzmk
  projects:
    - name: zmk
      remote: forkedzmk
      revision: specificpr
      import: app/west.yml
  self:
    path: config
Building Locally
When building from a pull request locally, you'll need to perform the local user setup, but using the repository of the pull request rather than the official ZMK repository. You can then build and flash as usual.
Creating a ZMK Module
Please see the dedicated page here for information on creating modules.